
site management automation tool |

I. Record And Execute A Test Case
II. Editing The Configuration file
III. Using The Distributed Client/Server Application
Recording a Test Case
In order to use webtester, you first need to create at least one test case. After creating the test case, another
application will need to be used to execute the test case. For the purposes of this tutorial, assumptions will be made
that the user is using Mozilla in combination with the proxy GUI application.
First, you need to start the proxy application. If you are using windows, this can be done using the "startProxyGUI.bat"
file. If you are using linux or some other UNIX based operating system, then use the "startProxyGUI.sh" file. Regardless of
the operating system being used, start the application via the command-line. Double-clicking on the BAT file from windows
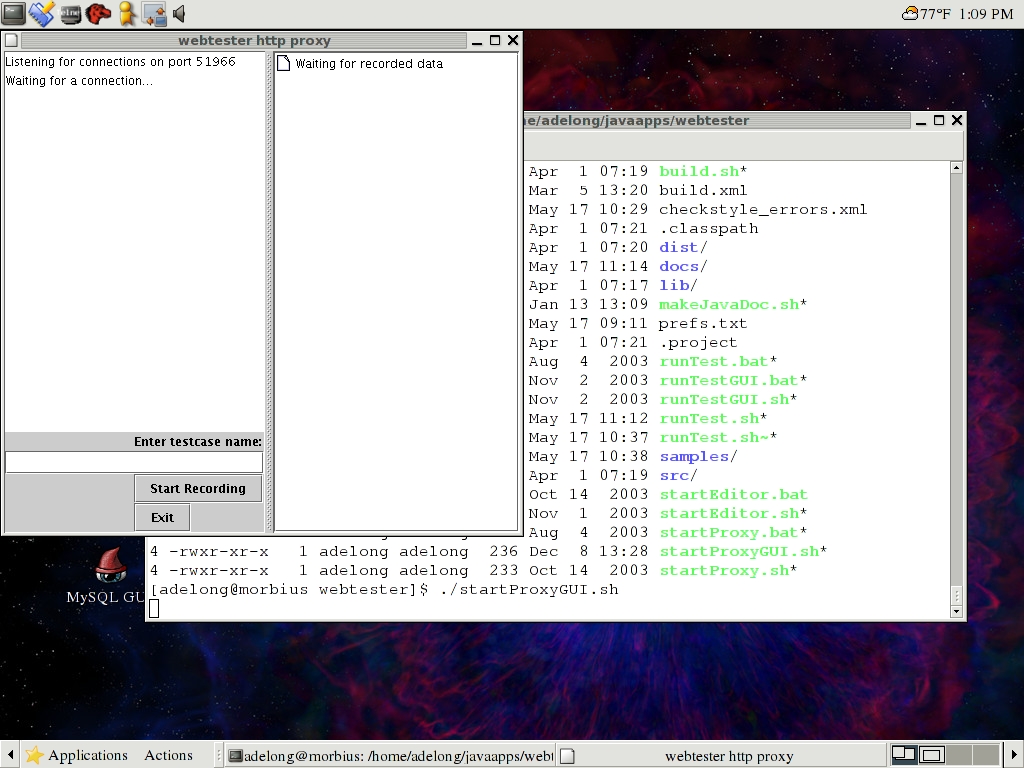
explorer could cause some problems where the classpath is concerned. To see what the proxy looks like when started, look at figure 1-a.
Now, start the browser, and modify the browsers' settings to use the proxy. For Mozilla, this can be done by choosing
Edit->Preferences->Advanced->Proxies, and you can view an example of this via figure 1-b. For IE,
the proxy settings are typically modified by choosing Tools->Internet Options->Connections->LAN Settings. Once choosing
this, it is necessary to select the option "Use a proxy server for your LAN", and enter the same host/port information as
you would for mozilla. By default, if the proxy is running on the same machine as your browser, the browser should point to
"localhost" on port "51966".
With the browser properly configured, it is time to instruct the proxy to start recording. To do this, enter a
test case name and click the "Start Recording" button. An example of what you should expect to see when performing these
steps is provided in figure 1-c. Figure 1-c hasn't been updated to illustrate this, but starting with the beta 1.2 release, the proxy contains a "Record Images" option that appears under the "Exit" button. Image data will only be recorded if this option is selected. NOT selecting this option causes the proxy to, in general, work faster.
Now, go to your browser and enter the URL you want to be the starting point of your test case. It might not be
a bad idea to clear the browser cache, or delete temporary internet files, if you want to be sure none of the data on
the site is pulled locally. After entering the URL, wait for the page to load. This could take awhile depending on
how much data is being requested from the site. The proxy is single-threaded, whereas browsers normally use up to four
connections to retrieve data, so you will notice that accessing websites via the proxy is slower than normal browsing.
The slowness is necessary in order to make sure that requests are recorded in the proper order, but is not as noticeable if you do not choose to record image data in your test case. In any case, once
the site has been loaded, the right frame of the proxy should be updated to indicate what URLs and associated data were
recorded. An example of the proxy view after recording data is given in figure 1-d.
If you want to continue recording additional URLs, continue to do so by simply visiting the URLs until you are
satisfied that all URLs you want included in your test case have been accessed. After visiting all the URLs, you
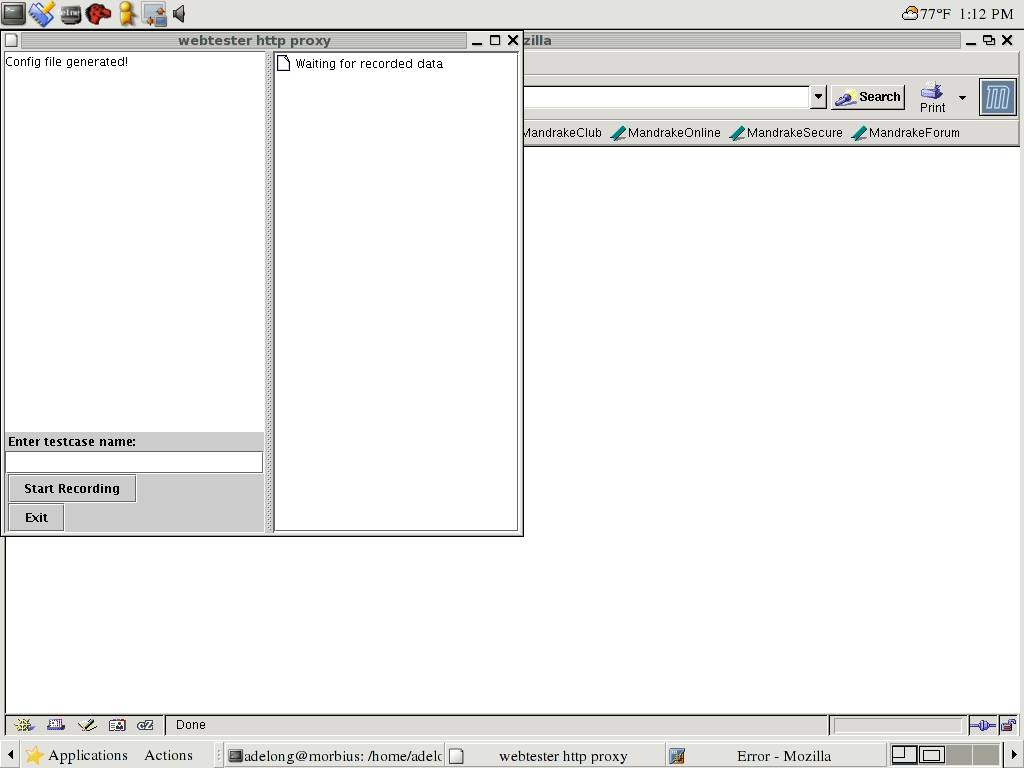
will need instruct the proxy to stop recording and generate the configuration file. Do this by switching to the
"webtester http proxy" window, and click the "Stop Recording" button. A new window will then pop-up requesting the
remaining required information before generating the configuration file. An example of this can be viewed via
figure 1-e. After you have entered all the necessary values, click on "Generate Config File"
to instruct the proxy to generate the configuration based on the recorded data. Once the proxy is finished, you
should see previously recorded data disappear and a notification displayed that the configuration file was generated.
A sample of this can be seen via figure 1-f. With the configuration file generated, unless
you want to record additional test cases, press the "Exit" button to close the proxy.
With the test case recorded, the next step is to execute it. This can be done in a non-interactive way via a
command-line application. This is most useful if you are wanting to schedule times for the test case to run, such as
you want your website validated once per hour, etc. If this is what you want, then look at the "runTest.bat" file if
you are using windows, or "runTest.sh" if you are using a UNIX based operating system. Otherwise, it is advisable
to use the GUI application designed for executing test cases.
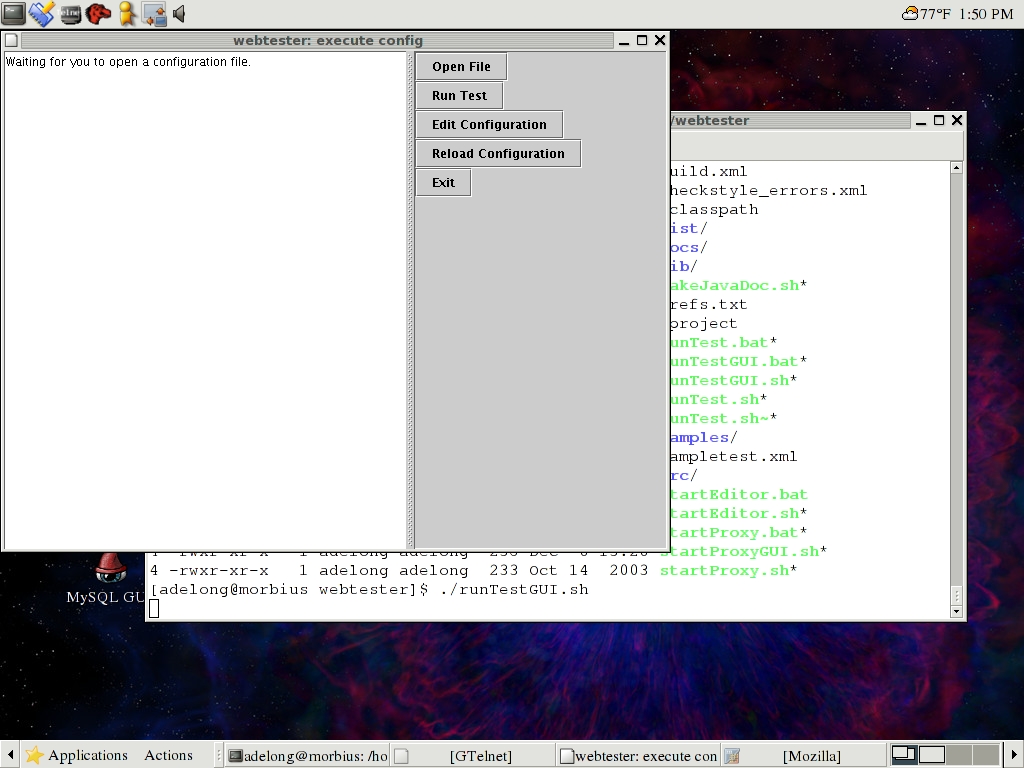
To start the GUI application mentioned previously, execute "runTestGUI.bat" if you are using windows, or "runTestGUI.sh"
if you are using a UNIX based operating system. Once the application has been started, you should see something that looks
like figure 2-a. Click on "Open File" and select the configuration file generated by the
proxy earlier.
Once the configuration file has been loaded, if there are no errors parsing the file, then you should be in a
position to execute the configuration. Figure 2-b shows how the application appears after
the configuration is loaded, but before it is executed. Clicking on the "Run Test" button will start executing the
test cases defined in your selected configuration file. The application will seem to stop responding during this time,
although you may see things being output via the command prompt. Once the application has finished executing the
test cases, then you should see a summary of what was encountered. If no errors were encountered, the summary will
be quite similar to that given in figure 2-c.
Editing The Configuration File
Now that you know how to record a test case, and execute the test case, it is necessary to know how to edit the test
case. Sometimes, the recorded test case requires modifications before it will work. Otherwise, eventually content changes
and it may be necessary to edit the test case to keep it valid and up-to-date. There are two ways to edit the config file.
One way is to use the config editor GUI application. Another is to use a text editor to edit the raw XML data.
To begin with, we will examine using the config editor GUI. To start the application, execute "startEditor.bat" if
you are using windows, or "startEditor.sh" if you are using a UNIX based operating system. Once the application has started,
you should see something similar to figure 3-a.
Now, open a file to edit by selecting the "Open File" button and choosing a valid configuration file from the list.
For the purposes of this example, the "samples/config.xml" file distributed with webtester is used. Figure 3-b
shows what you should see after the configuration file has been opened. The frame on the left contains the graphical
representation of the configuration. The configuration is separated into "global" config options, and the individual test
cases. For this example, you can see that we have the global options, and one test case called "sample test". Each of these
can be expanded, via a mouse click, to see the details of these configuration options. Also, please note that each test case
must have a unique description. Having two test cases with the same description will cause unpredictable behaviour.
Editing a value is almost exactly like changing a filename in windows explorer. Basically, single clicking on
an option will cause it to become editable. At this point, modifying the data and pressing "ENTER" should result in
the values being modified. An example of selecting an option to modify is given in figure 3-c.
In addition to modifying existing values by editing them directly, some generic options are available. For instance,
a value can be deleted by highlighting it and selecting "Delete Value". A new value can be added, and subsequently edited,
by selecting "Insert New Value". Furthermore, an existing value can be converted to a generic Perl5 regular expression by
highlighting the option and selecting "Convert To Regex". An example of a value that has been converted to a regular
expression can be seen via figure 3-d. Finally, once editing is complete, clicking on
"Write Changes" will result in existing data overwriting the existing file.
At this point, most users can stop reading as the basic use cases have been convered. The remainder of this tutorial explains the
configuration file format in great detail for users who need to edit it by hand. For web developers and or testers, the
details might be quite important if the more complicated, and useful, features of webtester are going to be used.
For the purposes of discussing the config file format, please reference the "samples/samplewebtest.xml" file distributed with the
webtester application.
The global configuration section of the file, by default, appears as follows:
<?xml version="1.0"?>
<!DOCTYPE webtester-config>
<webtester-config>
<defaultnotificationaddress>somebody@yourdomain.com</defaultnotificationaddress>
<notificationsenabled>YES</notificationsenabled>
<numthreads>3</numthreads>
<onlyrunonce>YES</onlyrunonce>
<mailserver>smtp.yourdomain.com</mailserver>
<logpath>/mylogginpath/</logpath>
<spamthreshhold>2</spamthreshhold>
<fromemailaddress>webtester@yourdomain.com</fromemailaddress>
<statsreporting>YES</statsreporting>
<statsemail>ON</statsemail>
<randomize>yes</randomize>
<runtime>5</runtime>
defaultnotificationaddress: This is the email address that receives all notifications sent by the application.
notificationsenabled: If set to "YES", then notifications will be sent if an error is encountered. Otherwise, no notifications are sent under any circumstance.
numthreads: The number of threads to use when executing test cases. Think of this as the number of users being simulated.
onlyrunonce: If set to YES, all test cases are executed then the application quits. Otherwise, the test cases are executed in an infinite loop.
mailserver: This is the SMTP server used to send email notifications.
logpath: The place where logfiles, and temporary files, are stored.
spamthreshhold: The number of notifications that will be sent before webtester considers it to be spam and stops sending notifications.
fromemailaddress: The FROM address that appears in webtester email notifications.
statsreporting: If set to YES, then statistics are sent to the webtester website. More information about these statistics are given in the FAQ.
statsemail: If set to ON, then after test cases have been executed, an email containing statistics about the tests will be sent to the default notification address.
randomize: If set to "yes", then the order in which test cases are executed is random. Otherwise, they are executed in the order they appear in the config file.
runtime: If onlyrunonce is set to NO, then the application will execute test cases for the number of specified minutes.
In addition to the global configuration, test cases are defined. The sample file, samplewebtest.xml, contains several test cases.
TLet's look at a simple test case called "post redirect test".
<testcasespecification>
<testcasedescription>post redirect test</testcasedescription>
<url><![CDATA[http://192.168.0.101:8081/samples/index.jsp]]></url>
<method>GET</method>
<formdata><![CDATA[]]></formdata>
<response-regex><![CDATA[Welcome to this sample web application, designed to be used to illustrate webtester functionality.]]></response-regex>
<response-regex><![CDATA[Please select from one of the following options:]]></response-regex>
<response-regex><![CDATA[Dollar Value Test]]></response-regex>
<response-regex><![CDATA[Post Redirect Test]]></response-regex>
<response-regex><![CDATA[Large Data Set Test]]></response-regex>
<response-regex><![CDATA[Dynamic Date Test]]></response-regex>
<url><![CDATA[http://192.168.0.101:8081/samples/postredirect.jsp]]></url>
<method>GET</method>
<formdata><![CDATA[]]></formdata>
<response-regex><![CDATA[This page is used to test the POST redirect feature, and to make sure the proxy works correctly when recording such a test case.]]></response-regex>
<response-regex><![CDATA[Return to Main Page]]></response-regex>
<url><![CDATA[http://192.168.0.101:8081/samples/postredirect.jsp]]></url>
<method>POST</method>
<formdata><![CDATA[submit=Post+Redirect]]></formdata>
<response-regex><![CDATA[If the POST redirect worked, the proxy should record this page as the response.]]></response-regex>
<response-regex><![CDATA[Return to Main Page]]></response-regex>
</testcasespecification>
As you may have noticed, a test case, in its most simple form, consists of a URL, the method used to call the URL, the
data sent to the URL, and one or more regular expressions expected to be returned as a result of calling the URL. There is
no limit to how large a test case can be, or how many test cases are allowed. The main limitation is memory and patience as
processing requirements increase. Most modern machines should easily be able to run 20-40 concurrent test cases however.
There are more detailed options when configuring specific testcases, that are not present in the above example. The available options
and what they do are described below, although variable assignment options are not described here. They are illustrated in the
sample configuration file distributed with webtester, samplewebtest.xml, however. In the future, I hope to provide some actual use cases for the
remaining options.
basic-auth-realm:
If HTTP basic authentication is required for the test case, provide the "realm" here.
basic-auth-user:
If HTTP basic authentication is required for the test case, provide the "user" here.
basic-auth-password:
If HTTP basic authentication is required for the test case, provide the "password" here.
proxyhost:
If you wish for your testcases to use a proxy, specify the hostname here. This is useful if your company requires all HTTP connections to go through a proxy, or if you wish to capture the data the testcases generate for some other purpose.
proxyport:
This is the port that should be used when connecting to the host specified in proxyhost.
timeout:
If you want to set a timeout limit for the connections in a test case, specify a value in seconds for this configuration value. This may be useful if you have applications which require a long time to respond, or if you want to receive a notification whenever the connections are not responding in an acceptable amount of time.
sleep:
The sleep parameter instructs webtester to wait the specified number of seconds before moving to the next URL in the testcase. This is useful if the web application being tested requires some amount of time to process data in between website accesses.
Using The Distributed Client/Server Application
As specified elsewhere on this website, on of the purposes of webtester is to allow you to simulate load on your website. The Distributed Client/Server application is intended to make this simulate, as closely as possible,
traffic from clients distributed across any given network.
As mentioned earlier, webtester allows you to create a configuration file, and execute it indefinitely, or for set amounts of time, for load testing. This is very useful for generating load from a single point on your network. But, web applications in the real world accept connections from more than one client. The distributed client/server application is intended to simulate this condition so you can be more confident about how your applications will behave in the real world.
To start this application, if you are using a UNIX based operating system, execute the "startDistributedGUI.sh" file. If you are using windows, execute the "startDistributedGUI.bat" file. Once the application is started, you should see a screen similar to the one illustrated in figure 4-a.
The framework of this application is arranged so that there is one "master" server, and any number of clients. The "master" instance does not execute any test cases, it simply hands them off to the clients and provides feedback via the textarea on the left side of the application window. The "clients" will ping the server every few seconds inquiring as to whether test cases are avialable. If a file has been loaded on the "master" server, then that configuration is passed to each client, which in turns executes the test cases.
The first thing to do, then, is to set up your server. Do this by selecting the "Set as master" checkbox. When you do this, the server will start and should indicate it is waiting for connections, as illustrated by figure 4-b.
The same application is used to start the client applications as well. So, start the client in the same way the "master" server was started. Only, this time select "Set as client". This will result in the application asking for the address of the server, as indicated in figure 4-c. You should enter the address of the machine running the "master" server. If done correctly, you should notice that the "client" connects to the "master" and is assigned a unique "node number".
Now, as long as you do nothing, the "client" will keep connecting to the "master" server every few seconds, but otherwise nothing else will happen. You have to load a configuration file on the "master" server before any of the "clients" will execute them. So, click on the "Open File" button and select a valid configuration file. After doing this, the next time a "client" connects, the "master" should send the configuration data to it. The "client" will then execute the test cases. After executing the test cases, the "client" will connect to the "master", and the process will being anew. Therefore, all "clients" will continue executing the configuration file loaded into the "master" server until you do something to make them stop.
Making the clients stop is fairly simple, however. In the "master" window, click on the "Unload File" button. Then, the next time the "client" connects to the "master" server, it will be told it has no test cases to execute.
The number of clients supported is not controlled by the application. Therefore, you can keep adding clients until you either use all bandwidth on your network, or the "master" server is overwhelmed by the number of connections.
The importance of this functionality is that if you have 50 PCs in your company, you can easily simulate 49-50 users accessing your web site. Simply start the "master" on one of the PCs. Then configure each of the other PCs as a "client" which connects to your master. All machines will then execute the same configuration, which results in distributed load being placed on your web applications.
|
Need Help? Send an email requesting support
|